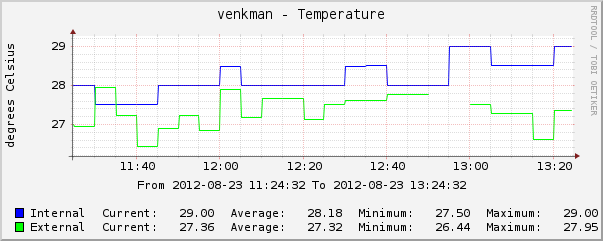
I’ve updated temper-mon and my Cacti templates to better work with the TEMPerNTC device, which has an external temperature sensor in addition to the internal one.
New features:
- temper-mon: Provide a -c switch to output in Cacti script multiple output field format.
- temper-mon: Added bounds checking to disregard high/low values (outputs “NaN” instead, so Cacti doesn’t graph spikes).
- temper-mon: Provide calibration x (multiplicative) and n (additive) factors independently for the internal and external sensor.
- Cacti templates: Updated for new temper-mon calibration arguments.
- Cacti templates: Added TEMPerNTC templates for graphing both sensors on one graph.
The new version of the temper-mon package with updated Cacti templates is available in my repository. You can also download it directly here. If you don’t want to install the .deb package, open it as a .tar.gz file and extract the contents.
Notes:
As before, temper-mon is intended for use with the USB HID TEMPer devices. lsusb displays these as “1130:660c Tenx Technology”. If you need help with a “0c45:7401 Microdia” device, see pcsensor-0.0.1 and Russ Hill’s comment here.
Users who want to graph on the Fahrenheit scale should call temper-mon -f. To create graphs in degrees Fahrenheit in Cacti:
- Edit the “TEMPer USB deg C” and “TEMPerNTC USB deg C” data input methods to add a -f switch to the temper-mon command
- Edit the “TEMPer – Temperature deg C” and “TEMPerNTC – Temperature deg C” graph templates, and change the y-axis Vertical Label to “degrees Fahrenheit”.
- In the names of all “TEMPer” data input methods, data templates, and graph templates, change all references to Celsius to Fahrenheit. However, most of these are cosmetic and do not appear in the graphs themselves.
The TEMPer devices require calibration. I recommend comparing them to a known good thermometer, even a good analog mercury one, and using the --n-external and --n-internal flags. These are supported in Cacti as required arguments when creating or editing the data source. For example, I have set my the external sensor calibration to -2.75 degrees for my TEMPerNTC device. Once calibrated, they appear to be reliable along the range of common room temperatures.
The n calibration factor is handy, but an x (multiplicative) factor also exists. You can abuse this calibration feature to output temperature in any other scale. The following commands are equivalent:
temper-mon -x 1.8 -n 32
temper-mon -f
Bonus points for the first geek who posts a screenshot of a graph in degrees Kelvin.
The TEMPerNTC’s external sensor returns a lot of errors, most commonly a high value of 285.636229601119 °C. This seems to be related to an error initialising the device, and may be a bug in the USB::PCSensor::HidTEMPer perl module. As this is above the stated upper limit of the sensor (150 °C), temper-mon returns NaN instead. This causes Cacti to print a break in the graph, such as in the graph above. I prefer this to a large spike which blows the scale of the y-axis.
-
Hello and thanks for sharing for excellent effort.
FYI, your link to the TEMPer tarball returns with a 404 error.
Regards,
Jack.-
Yup. The script extracted from the .deb is working well (on a Raspberry Pi).
Thanks again for your great work. Much appreciated. -
once the temper-mon package is installed, you can find the cacti templates in /usr/share/temper-mon/ at least on raspian
pi@raspberrypi:/usr $ ls /usr/share/temper-mon/
cacti_graph_template_temperntc_-_temperature_deg_c.xml
cacti_graph_template_temper_-_temperature_deg_c.xmlThanks to Tyler for his awesome work putting this package together!
-


4 comments
Comments feed for this article
Trackback link: https://www.tolaris.com/2012/08/23/temperntc-support-added-to-temper-mon-and-cacti/trackback/