


In another post, I talked about running Wireshark and other sniffing programs as an unprivileged user. You can do the same with Nmap, but it’s a little more tricky.
WARNING: This is dangerous. The Nmap Scripting Engine (NSE) allows scripts to sniff the network, change firewall roules and interface configuration, or exploit vulnerabilities including on localhost. It’s possible, especially with elevated capabilities, for a clever person to use Nmap and NSE to escalate to full root privileges. If you do not understand these risks, do not do this.
Nmap can perform much of its functionality as a normal user, so it checks if it has permissions to perform certain actions before falling back to safer behaviours. For instance, performing a TCP SYN scan (-sS) requires opening raw sockets. If this fails and if the user didn’t explicitly specify -sS, Nmap falls back to a normal TCP connect scan (-sT).
You can configure Nmap to use Linux capabilities just like Wireshark. However in certain circumstances (such as specifying a source port less than 1024), Nmap also needs CAP_NET_BIND_SERVICE.
sudo setcap cap_net_raw,cap_net_admin,cap_net_bind_service+eip /usr/bin/nmap
Some NSE scripts may require additional capabilities, but these three should suffice.
You must explicitly tell Nmap that it has these capabilities:
nmap --privileged -sS 192.168.0.1
You can save the extra typing by setting the NMAP_PRIVILEGED environmental variable.
export NMAP_PRIVILEGED=""
nmap -sS 192.168.0.1
There are many places to do this. Add the export line to one of the following:
~/.bashrc, for bash~/.profile, for most shells as well as bash~/.xsessionrc, for most graphical environments~/.gnomerc, for GNOME only
I prefer .xsessionrc, since it will be inherited by any program I launch, including terminals and shells. However, some versions of LightDM, the login manager used by Ubuntu since 11.10, don’t source this file. An easy workaround for those users is to upgrade to Linux Mint use .gnomerc instead.
As with other programs using elevated capabilities, you should restrict Nmap to a certain group:
chgrp adm /usr/bin/nmap
chmod 750 /usr/bin/nmap
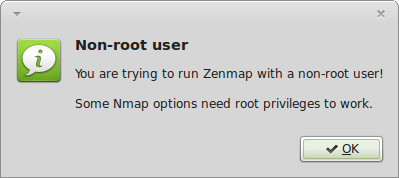
Unfortunately Zenmap, Nmap’s GUI, ignores the NMAP_PRIVILEGED environment variable. On startup, it will complain that “You are trying to run Zenmap with a non-root user! Some Nmap options need root privileges to work.”
If you used the .xsessionrc or .gnomerc methods above, Zenmap and the Nmap instances it calls will inherit NMAP_PRIVILEGED variable. So you can dismiss the annoying warning and use Zenmap as if you are the root user. I submitted a patch to nmap-dev, which was accepted and will be available in a release after Nmap 6.25. If your release doesn’t have this fixed yet, apply it with:
wget -q http://www.tolaris.com/blog/wp-content/uploads/2013/01/NMAP_PRIVILEGED.patch -O- \
| sudo patch /usr/share/pyshared/zenmapGUI/App.py
You can now run Nmap and Zenmap as an unprivileged user without warnings.
Update 2013-01-29: At Fyodor’s request, I’ve rewritten this guide for Secwiki.org.
Tags: networking, nmap, security
No comments
Comments feed for this article
Trackback link: https://www.tolaris.com/2013/01/24/running-nmap-as-an-unprivileged-user/trackback/